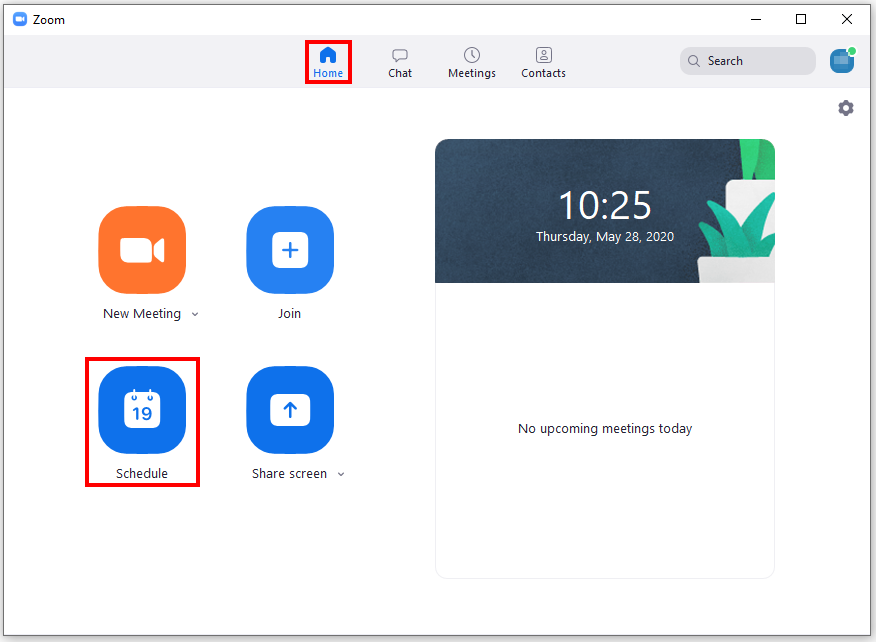
Using ZOOM X via Desktop Client (Windows, Linux)

This guide is optimized for Windows, but also serves as an orientation for Linux users.

Requirements:

  • You have registered for ZOOM X. Register
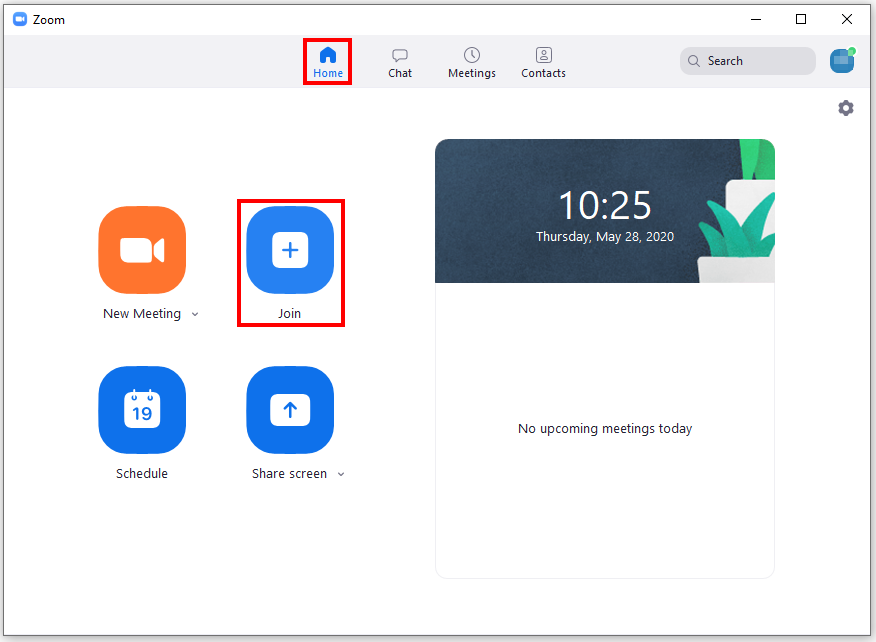
  • You have installed the Zoom desktop client ("Zoom-Client für Meetings"). Download

Note: To log in, use the login via SSO (Single-Sign-On) of Münster University.

  • Login via SSO

    Open the Zoom desktop client "Start Zoom" or "Zoom". Click on "Login".

    © Uni MS IT

    Do not enter your login data in this step, but click on "Login via SSO".

    © Uni MS IT

    In the following step you will be asked to select the company domain. Enter "uni-ms" and then click on "Continue".

    © Uni MS IT

    Now enter your university ID and your university password and click on "LOGIN".

    © Uni MS IT

    You will be directed to your zoom profile page. Click on "Start Zoom" to return to the client.

    © Uni MS IT
  • Join a Meeting

    You need the meeting ID and the meeting password from the moderator. Open the desktop client, click on "Home" in the upper menu bar and then on "Join".

    © Uni MS IT

    Enter the meeting ID and your name. This is displayed to the other participants in the meeting. Click on "Join". Then enter the meeting password. Afterwards click on "Join the audio by computer" to enter the meeting room.

    © Uni MS IT

    2. Control Options

    You can make further settings in the meeting room:

    • Microphone (1): device selection, settings, mute
    • Camera (2): device selection, settings, de-/activate
    • Participants (3): list of participants
    • Chat (4): You can send messages to individual or all participants.
    • Screen Sharing (5): share your screen with other participants (You can show your entire desktop, an application window, or a browser tab)
    • Reactions (6)
    • Leave the meeting (7)

    2. Control Options
    © Uni MS IT
  • Start a Meeting (Moderator)

    1. Start a Meeting

    Open the Zoom desktop client and log in via SSO. Then click on "New meeting". Then click on "Join the audio by computer" to enter the meeting room.

    1. Start a Meeting
    © Uni MS IT

    2. Start a Meeting with the Personal ID

    Note: Your personal meeting room is a meeting room permanently reserved for you, comparable to an office. The personal meeting room has a fixed meeting ID and can always be reached via the same link, so you should not pass on this information at will. Only use the room for meetings with people you meet regularly.

    Open the Zoom desktop client and log in. To start a meeting with the personal meeting ID, click on the small arrow next to the "New Meeting" button. Check the box "Use my Personal Meeting ID (PMI)" (- make sure at your next meeting that the box is unchecked again). Move your mouse over your ID in the area below. You now have the following options:

    • Copy ID
    • Copy Invitation
    • PMI Settings
    First click on "PMI Settings".

    2. Start a Meeting with the Personal ID
    © Uni MS IT

     Make the following settings:

    • Password: tick
    • Video:
      • Host: on
      • Participants: depending on size and type of event
    • Audio: Telephone and Computer Audio
    • Audio Dial In: Dial in from Germany (If "Dial in from United States" is displayed here, click "Edit". Tick "Germany" and untick "United States" and confirm with "Done".)
    • Advanced options:
      • Waiting Room: Enable the waiting room for smaller meetings. You must manually allow every participant to join the meeting. This allows you to prevent unwanted people from joining the meeting.
      • Attend before host: Enable this feature for large meetings. Participants can enter the meeting before you are present. If the waiting room is activated, the function is disabled automatically.
      • Mute participants at entry: Activate this function for large events. Participants are muted when joining the meeting, but can activate their microphones.
      • Authorized participants only: Participants must be logged in to Zoom to join your meeting.
      • Record the meeting automatically: Deactivate this function. If you want to record meetings, you should start the recording manually and follow our instructions.
      • Alternative moderators: If you specify a co-moderator, you do not need to attend your meeting yourself. The co-moderator can represent you and has the same rights as you.
    To confirm your settings click on "Save".

    © Uni MS IT

    Now click on "New meeting". Then click on "Join the audio by computer" to enter the meeting room.

    © Uni MS IT

    3. Send Invitation

    You can view the (personal) meeting ID and the meeting password by clicking on the info icon in the upper left corner of the meeting room. You can copy this information and email it to the participants to invite them. Alternatively, you can invite participants directly from the bottom menu bar by clicking on "Participants" and then on "Invite".

    3. Send Invitation
    © Uni MS IT

    4. Control Options

    You can make further settings in the meeting room:

    • Microphone (1): device selection, settings, mute
    • Camera (2): device selection, settings, de-/activate
    • Security (3): lock meeting, waiting room, participant permissions
    • Participants (4): list of participants
    • Chat (5): You can send messages to individual or all participants.
    • Share screen (6): share your screen with other participants (You can show your entire desktop, an application window, or a browser tab)
    • Record (7): You must enable the recording function in your ZOOM X profile.
    • Closed Caption(8)
    • Breakout Rooms (9): Divide the participants into small groups (e.g. for group work).
    • Reactions (10)
    • End the meeting (11)

    4. Control Options
    © Uni MS IT
  • Schedule a Meeting (Moderator)

    1. Open Schedule Menu

    Open the Zoom desktop client and log in. Then click on "Planen" ("Schedule").

    1. Open Schedule Menu
    © Uni MS IT

    2. Meeting Settings

    In the "Topic" section, give the event a name, and set a date and time. Make the following settings in the other sections:

    • Meeting-ID: generate automatically
    • Password: tick
    • Video:
      • Host: on
      • Participants: depending on size and type of event
    • Audio: Telephone and Computer Audio
    • Audio Dial In: Dial in from Germany (If "Dial in from United States" is displayed here, click "Edit". Tick "Germany" and untick "United States" and confirm with "Done".)
    • Calendar: Outlook or Other Calendars
    • Advanced options:
      • Waiting Room: Enable the waiting room for smaller meetings. You must manually allow every participant to join the meeting. This allows you to prevent unwanted people from joining the meeting.
      • Attend before host: Enable this feature for large meetings. Participants can enter the meeting before you are present. If the waiting room is activated, the function is disabled automatically.
      • Mute participants at entry: Activate this function for large events. Participants are muted when joining the meeting, but can activate their microphones.
      • Authorized participants only: Participants must be logged in to Zoom to join your meeting.
      • Record the meeting automatically: Deactivate this function. If you want to record meetings, you should start the recording manually and follow our instructions.
      • Alternative moderators: If you specify a co-moderator, you do not need to attend your meeting yourself. The co-moderator can represent you and has the same rights as you.
    To confirm your settings click on "Schedule".

    2. Meeting Settings
    © Uni MS IT

    3. Send Invitation

    If you have selected "Other calendar", an invitation text with all necessary information will be displayed directly (see picture). You can copy the text via "Copy to Clipboard" and send it to the participants by e-mail. Close the window afterwards.

    If you have selected "Outlook" as your calendar, a new e-mail opens in your Outlook with an appointment and an invitation text containing all the necessary information about your meeting. You can send this e-mail to the participants.

    You can view the invitation text and the key data of the meeting at any time in the desktop client.

    3. Send Invitation
    © Uni MS IT

    4. Start/Edit/Delete Meeting

    Under the heading "Meetings" your upcoming meetings are displayed. If you click on a meeting, you have the following options:

    • Start
    • Copy Invitation
    • Edit
    • Delete
    If you want to start a scheduled meeting (at the scheduled time), click on "Start" here. You will then be dialed in directly as moderator of the meeting.

    4. Start/Edit/Delete Meeting
    © Uni MS IT

    5. Control Options

    You can make further settings in the meeting room:

    • Microphone (1): device selection, settings, mute
    • Camera (2): device selection, settings, de-/activate
    • Security (3): lock meeting, waiting room, participant permissions
    • Participants (4): list of participants
    • Chat (5): You can send messages to individual or all participants.
    • Share screen (6): share your screen with other participants (You can show your entire desktop, an application window, or a browser tab)
    • Record (7): You must enable the recording function in your ZOOM X profile.
    • Closed Caption(8)
    • Breakout Rooms (9): Divide the participants into small groups (e.g. for group work).
    • Reactions (10)
    • End the meeting (11)

    5. Control Options
    © Uni MS IT