

Manual Setup of the uni-ms and eduroam Wi-Fi networks
Note:
- We recommend that you use CAT for setting up Wi-Fi, as this will automatically set up both WiFis of the Uni-MS (uni-ms, eduroam).
- If this is not possible, you will find manual instructions here for setting up the “uni-ms” Wi-Fi network on various operating systems. For the ‘eduroam’ Wi-Fi network, simply follow the instructions again and replace “uni-ms” with “eduroam.”
Windows
1. Download and Installation of the Certificate
Download the following certificate and install it: WiFi certificate.
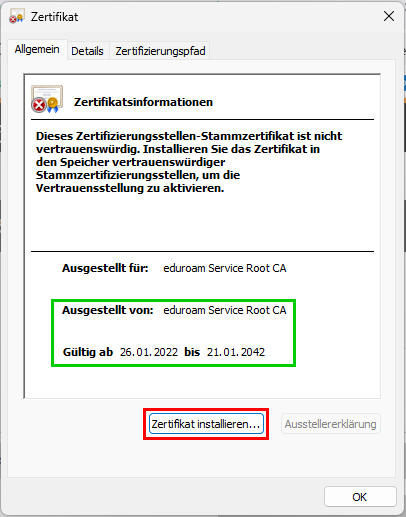
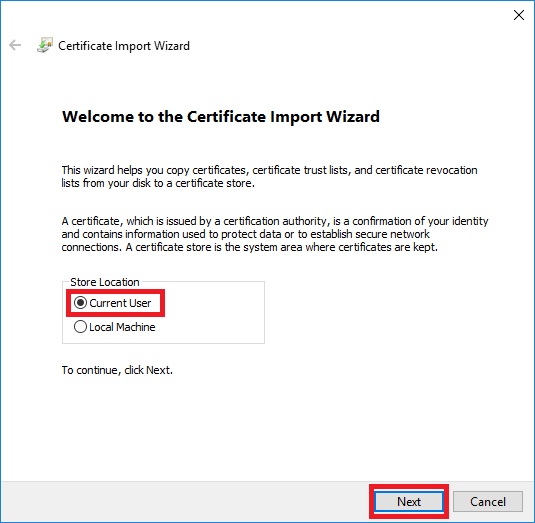
© CIT 2. Store Location of the Certificate
The store location should be "Current User".
© ZIV 3. Select certificate store
Select "Automatically select the certificate store based on the type of certificate".
Confirm all messages.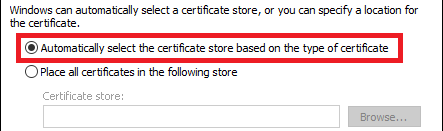
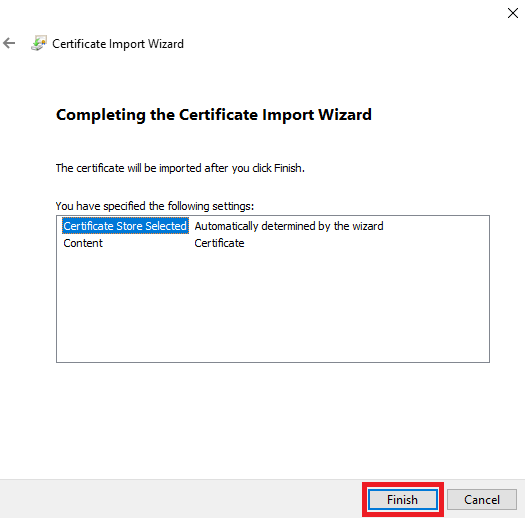
© CIT 4. Finish certificate installation
After clicking on "Finish", a message should confirm that the import process has been completed successfully. The certificate has been successfully imported.
© ZIV 5. Open Control Panel
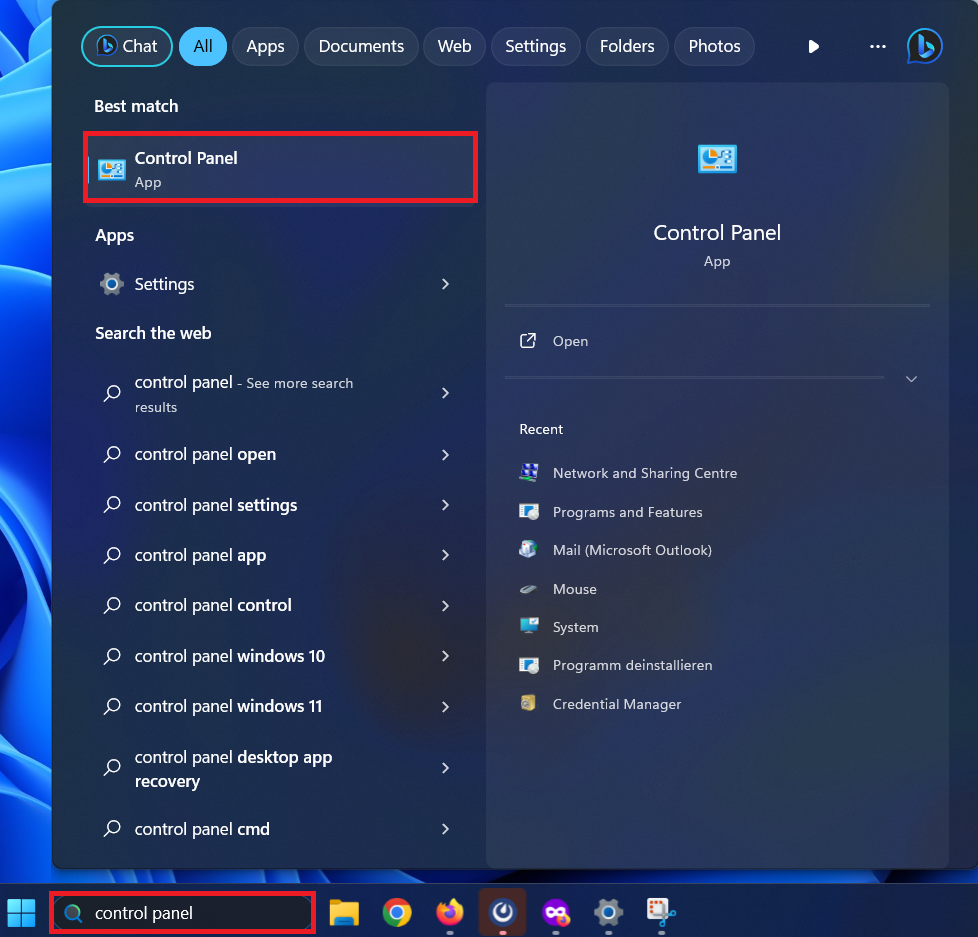
Enter Control Panel at the bottom of the Windows search and then open the search suggestion Control Panel App.
© CIT 6. Network and Internet
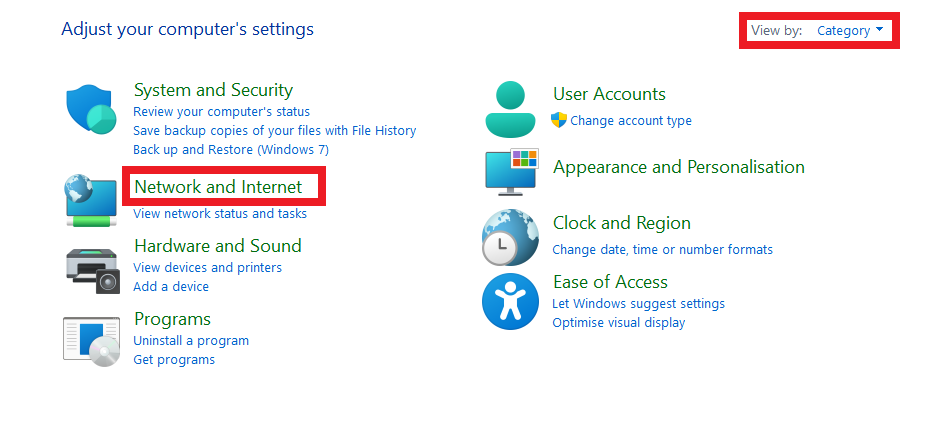
In the Control Panel, make sure that you have selected Category at View by in the top right-hand corner. Then open Network and Internet with a single click.
© CIT 7. Network and Sharing Centre
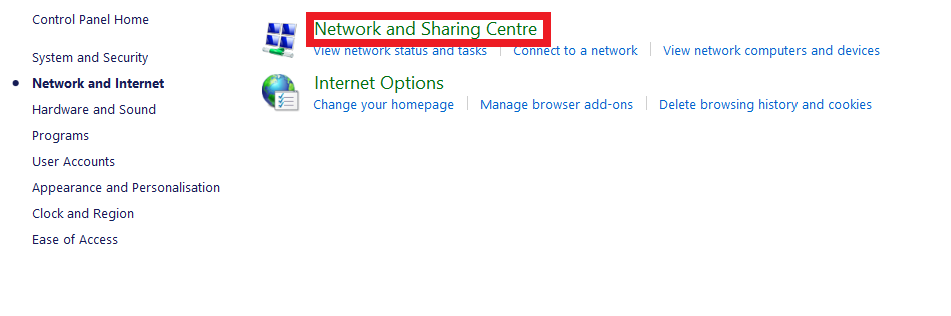
Now open the Network and Sharing Centre.
© CIT 8. Setting Up a New Connection
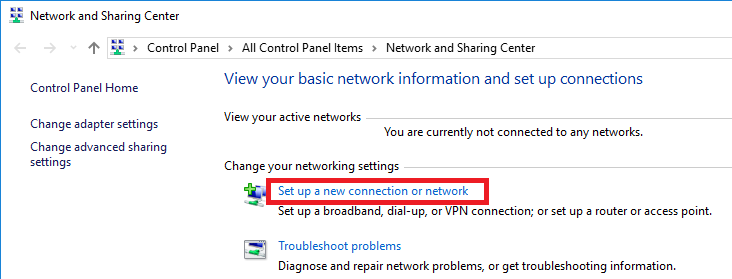
Select "Set up a new connection or network".
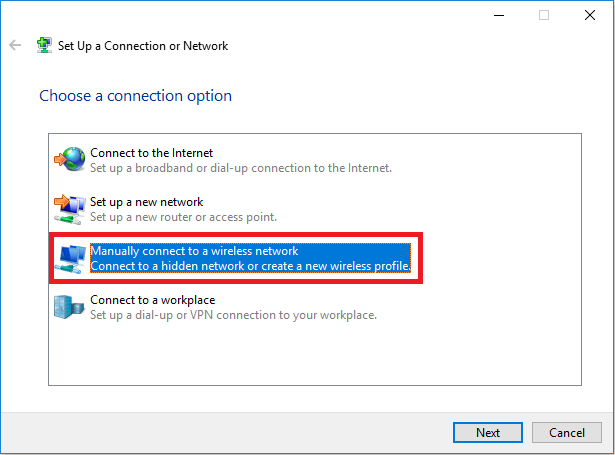
© ZIV 9. Connection Option
Click "Manually connect to a wireless network" and "Next".
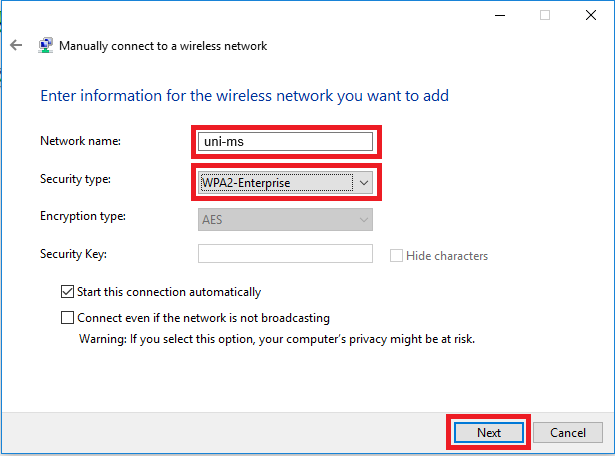
© ZIV 10. Information for the Wireless Network
Enter "uni-ms" (or "eduroam") as network name, as security type select "WPA2-Enterprise" and then click on "Next".
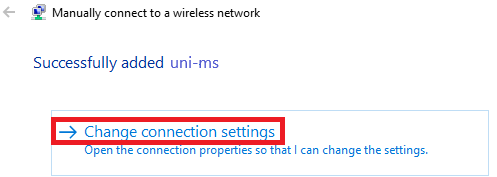
© CIT 11. Change Connection Settings
Click on "Change connection settings".
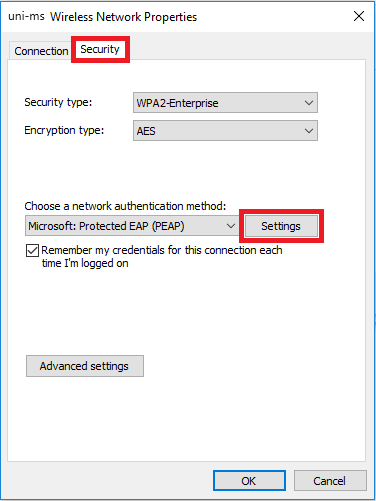
© CIT 12. Security
Select the tab "Security" and there "Settings".
© CIT 13. Security Settings
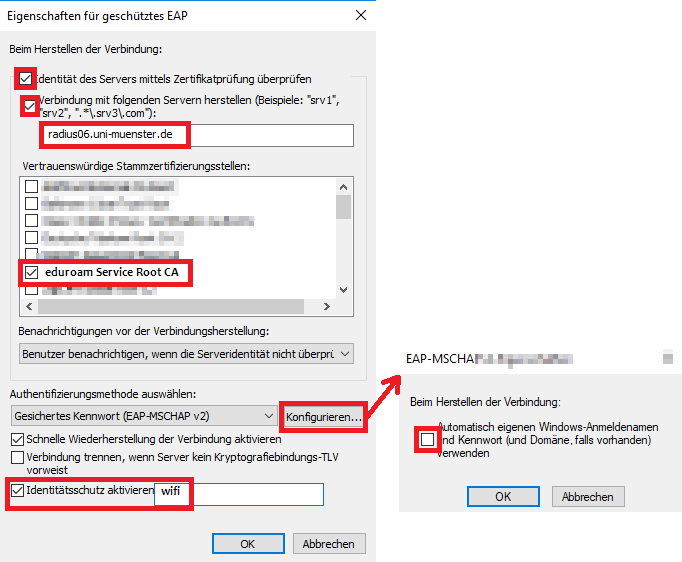
In the following window select the following options:
- Verify the server’s identity by validating the certificate: Tick
- Connect to these servers: Tick (server name "radius06.uni-muenster.de")
- List of Trusted Root Certification Authorities: eduroam Service Root CA
© CIT 14. Advanced Settings
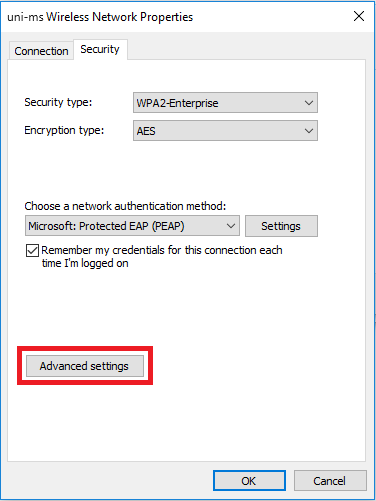
Click on "OK" to return to the previous window in which you click on "Advanced Settings".
© CIT 15. User Authentication
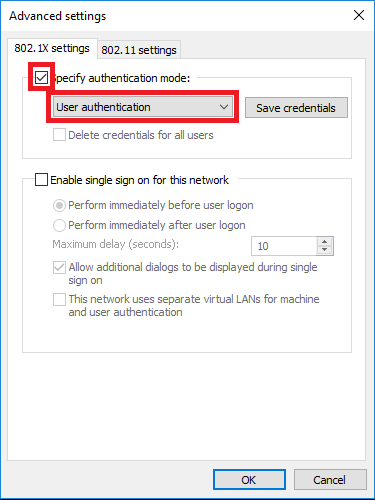
In the following window check "Specify authentication mode" and select "User authentication" in the drop-down menu.
© ZIV 16. Connect to the WiFi
You can now confirm / close all windwos and click on the WiFi symbol in the bottom right corner. Select the WiFi "uni-ms" (or "eduroam") there and click on "Connect". You will be asked to log in with your university e-mail address (YourUniversity-ID@uni-muenster.de) and your net access password.
Note: Please note that email aliases, such as firstanme.surname@uni-muenster.de will not work. The form Uni-Kennung@uni-muenster.de is mandatory for the setup.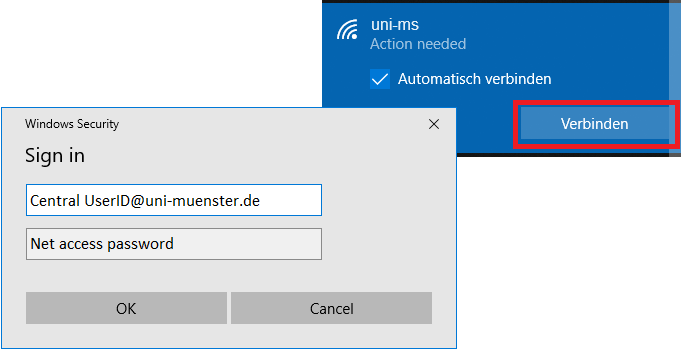
© CIT 17. Connected
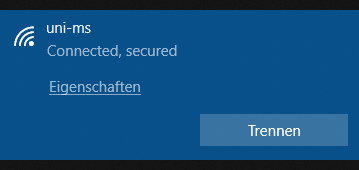
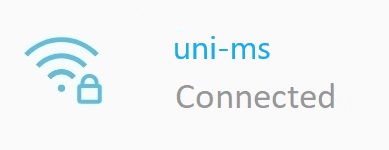
Finally the connection will be established with the Wi-Fi.
© CIT Android
1. Download of the Certificate
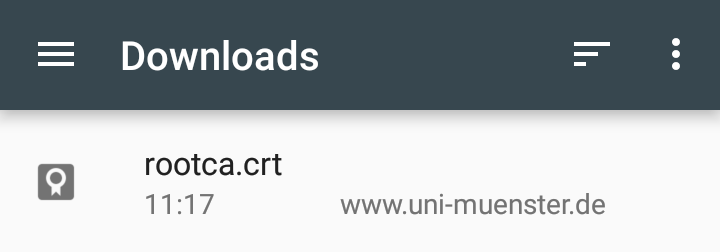
Download the required certificate via this link WiFi-certificate or the shown QR code. If the installation of the certificate does not start automatically, go to "Downloads" in the file manager of your smartphone and tap the file "rootca.cer (rootca.crt)".

© CIT 2. Open the Settings
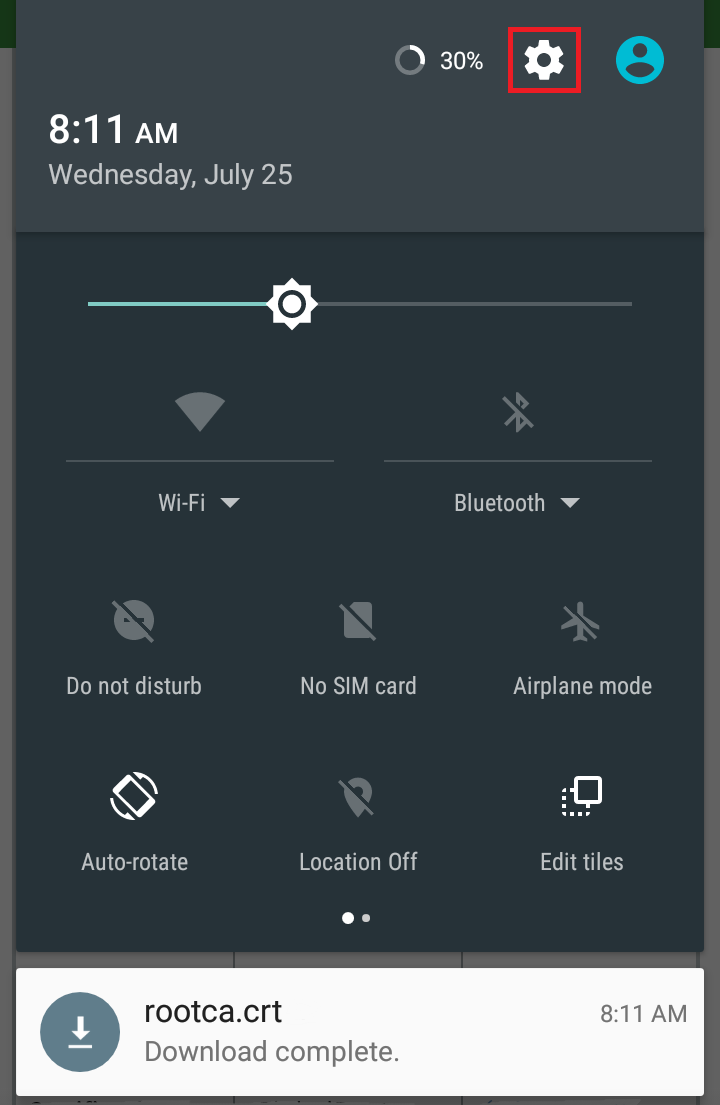
If the installation of the certificate starts immediately, please go to step 6 of this manual. If you get the message "Installation not possible because the certificate file could not be read", please go to the settings of your smartphone.
© ZIV 3. Security
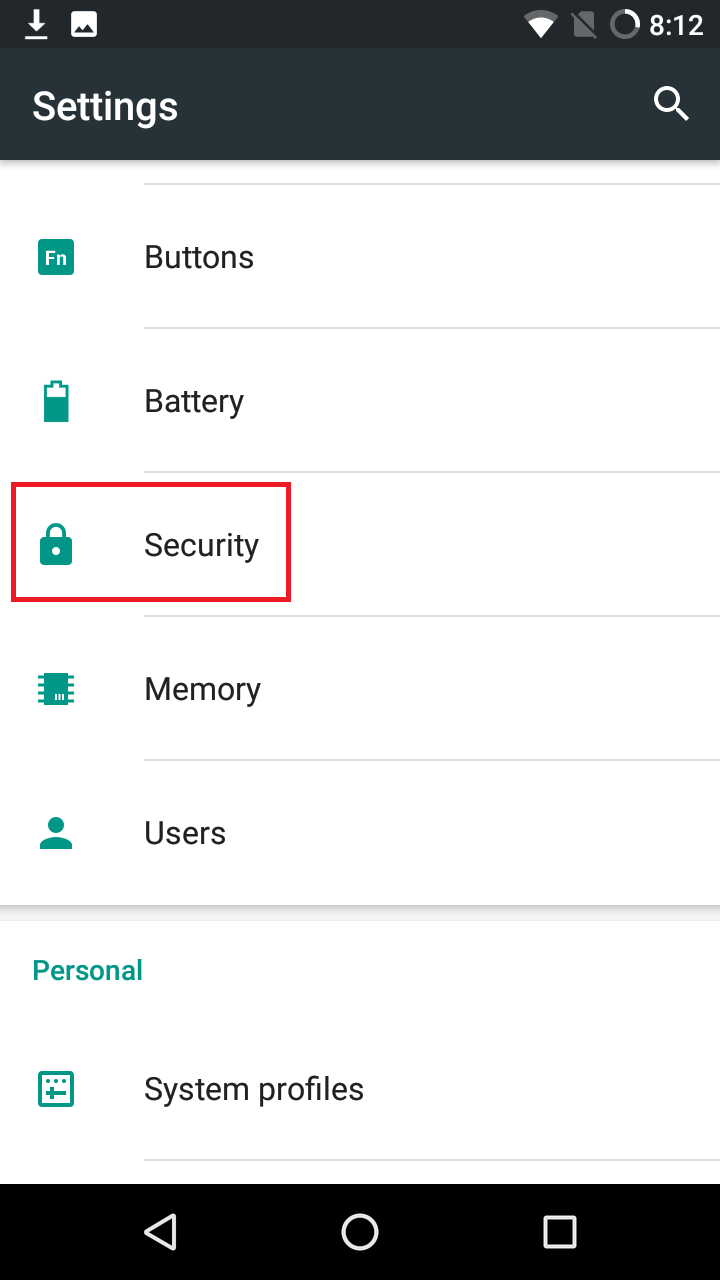
Select the item "Security" in the settings (if applicable, the item is called "Biometric data and security" or "Security and Privacy Policy"/"Additional security settings").
© ZIV 4. Install from Storage
Then select "Install from storage" (if applicable, to be found under the item "Other security settings") -> "WLAN certificate".
If this option is not available, go to "Encryption and credentials" -> "Install a certificate" -> "WLAN certificate".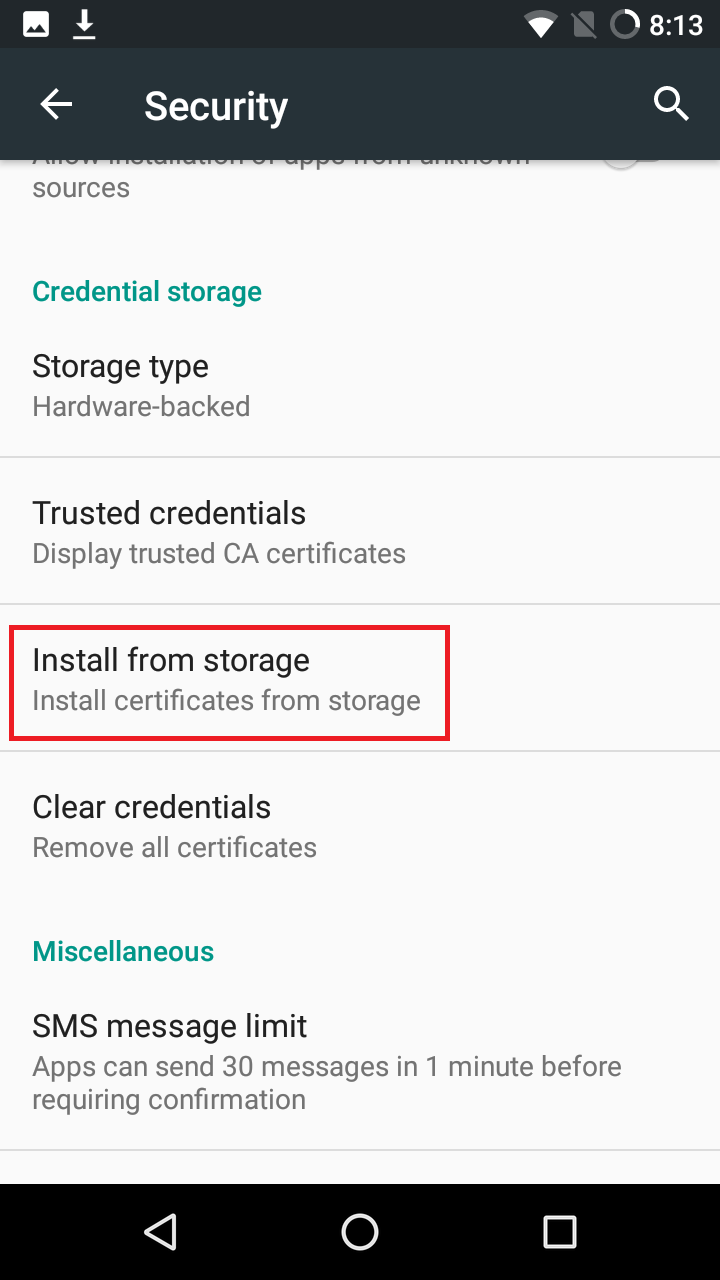
© ZIV 5. Select certificate
Tap the downloaded certificate.
© ZIV 6. Naming the Certificate
Give the certificate a name of your choice and, if necessary, select "WiFi" for the "Credential use". (If you have not set a screen lock PIN, you will be asked to do so in the next step. If the installation of the certificate does not proceed automatically, please repeat the previous steps.) Then confirm your entries with "OK".
The certificate ist now installed successfully.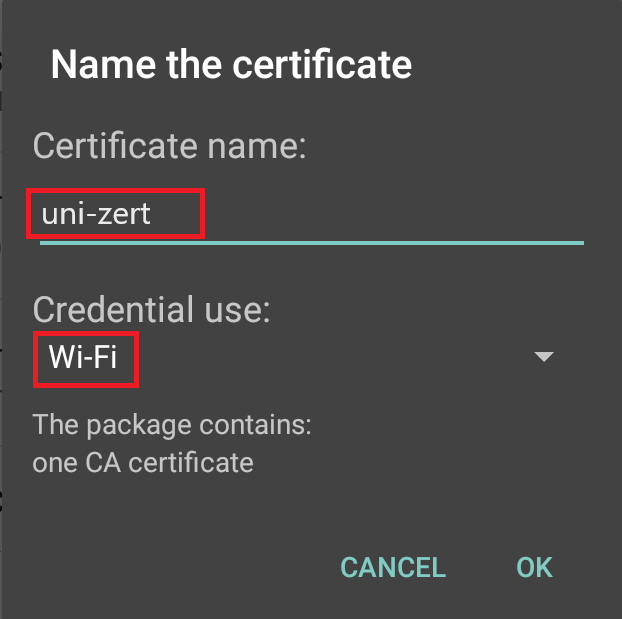
© CIT 7. Opening the WLAN settings
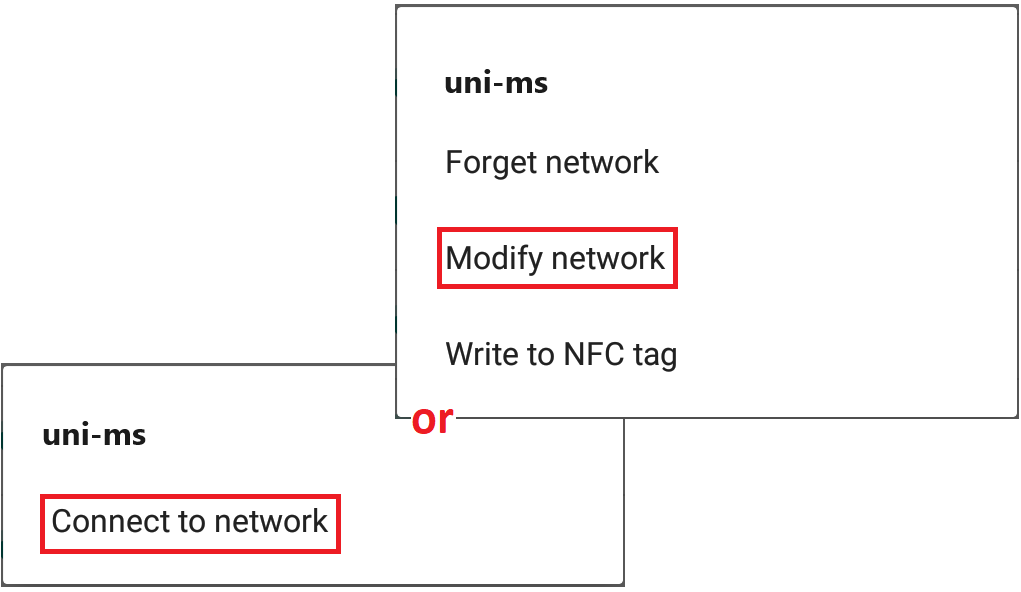
Go to the WiFi settings of your smartphone. (For some devices, you find your WiFi settings under: Settings > Wireless > Wi-Fi.) Tap on the WiFi "uni-ms" until a context menu appears. Select either "Modify Network" or "Connect to network" (if you have never connected to this WiFi before).
© CIT 8. Settings
Make the following settings in the window that appears:
EAP method: PEAP (ATTENTION: with Samsung devices from Android 11, TTLS may have to be set)
Phase 2 authentification: MSCHAPV2
CA certificate: the installed certificate (you chose the name by yourself)
Domain*: radius06.uni-muenster.de
Identity: YourUniversity-ID@uni-muenster.de
Anonymous Identity: wifi@uni-muenster.de
Password: Your network access password
Make sure that there are no spaces after the entries, as this will lead to errors when establishing a connection.
* Not available on all android versions, can be omitted if not available.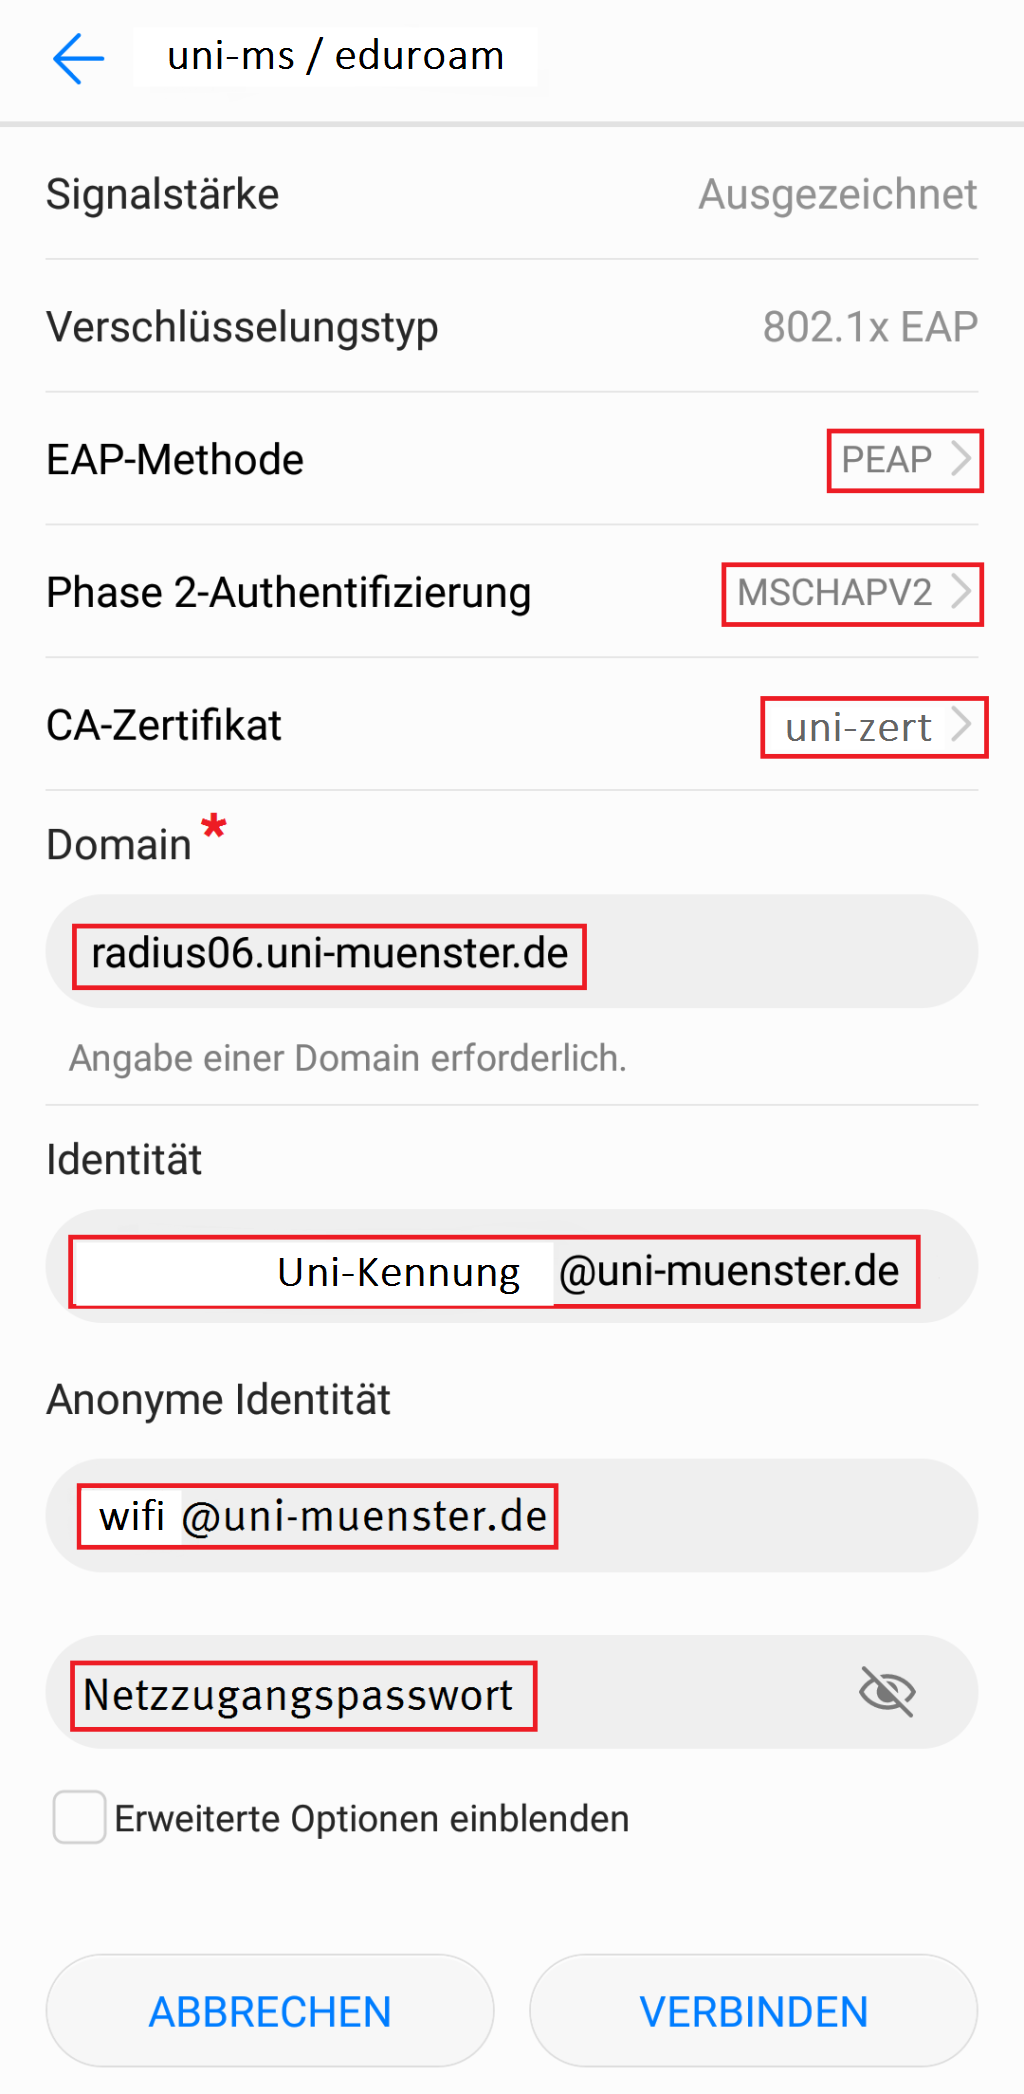
© CIT 9. WiFi Connection
After clicking "Connect", your smartphone should connect to the WiFi network.
© CIT Ubuntu 18.04
1. Select Network
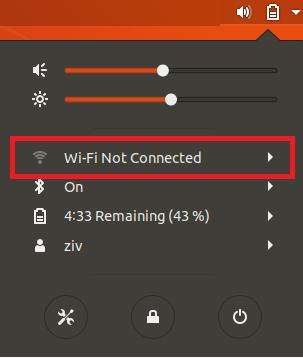
Open the status menu in the upper right corner. Choose the option "WiFi Not Connected" and click on "Select Network".
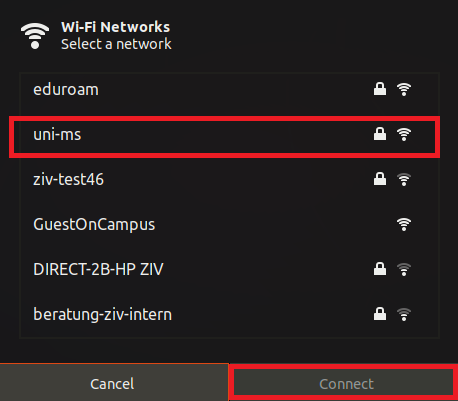
© ZIV The available networks are shown. Choose "uni-ms" and click "Connect".
© CIT 2. WiFi Security Settings
Download the required certificate and apply the following settings in the window for authentication of the wireless network:
WiFi Security: WPA- & WPA2-Enterprise
Authentication: Tunneled TLS
Anonymous Identity: wifi@uni-muenster.de
Domain: radius06.uni-muenster.de
CA-Zertifikat: dfn_eduroam_root_2022.cer
Inner Authentication: MSCHAPv2 (kein EAP)
Username: Your university mail (universityID@uni-muenster.de)
Password: Your network access password
Afterwards, please click "Connect" to save your settings.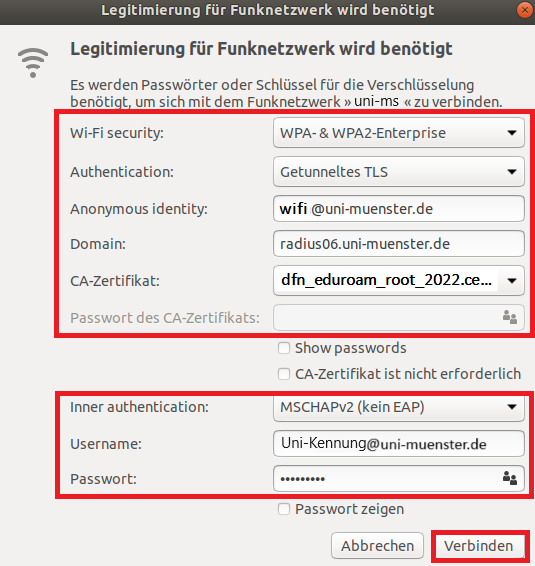
© CIT 3. Completing the Configuration
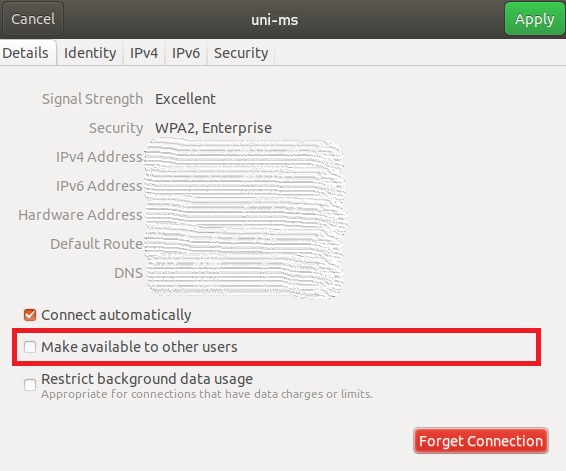
After you have established the WiFi connection, you can see the signal strength in the status menu. Click on the settings symbol. Under "Details" deactivate the option "Make available to other users" and click "Apply".
© CIT Ubuntu 20.04
1. Selecting Network
Open the status menu in the upper right corner. Choose the option "Wi-Fi Not Connected" and click on "Select Network".
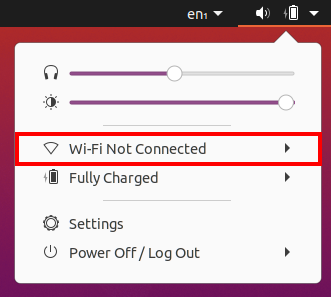
© Uni MS IT The available networks are shown. Choose "uni-ms" and click on "Connect".

© CIT 2. Wi-Fi Security Settings
Download the required certificate and apply the following settings in the window for authentication of the wireless network:
WiFi Security: WPA- & WPA2-Enterprise
Authentication: Protected EAP (PEAP) or Tunneled TLS
Anonymous Identity: wifi@uni-muenster.de
Domain: radius06.uni-muenster.de
CA certificate: dfn_eduroam_root_2022.cer
Inner Authentication: MSCHAPv2
Username: Your university mail (universityID@uni-muenster.de)
Password: Your network access password
Afterwards, please click on "Connect" to save your settings.© CIT 3. Completing the Configuration
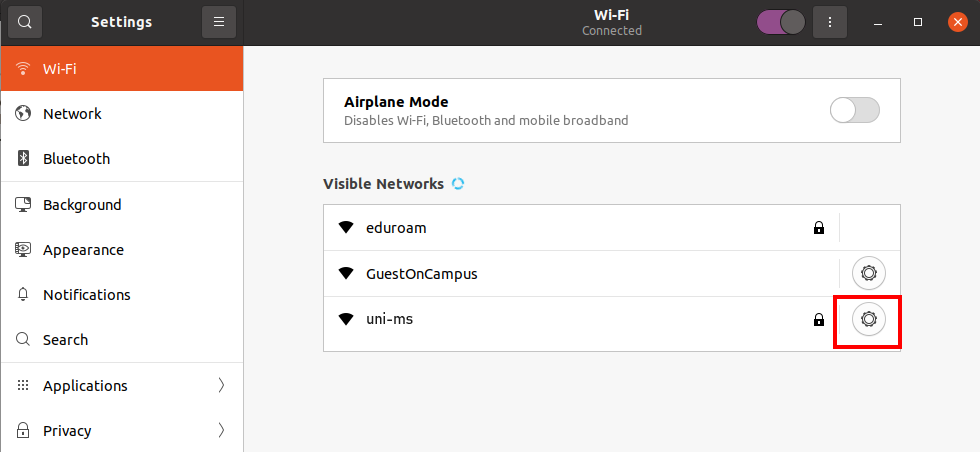
After you have established the WiFi connection, you can see the signal strength and the network’s name in the status menu. Click on the name „uni-ms“ and select "Wi-Fi Settings". In the overview of visible networks click on the cogwheel symbol in the row of "uni-ms" to the right.
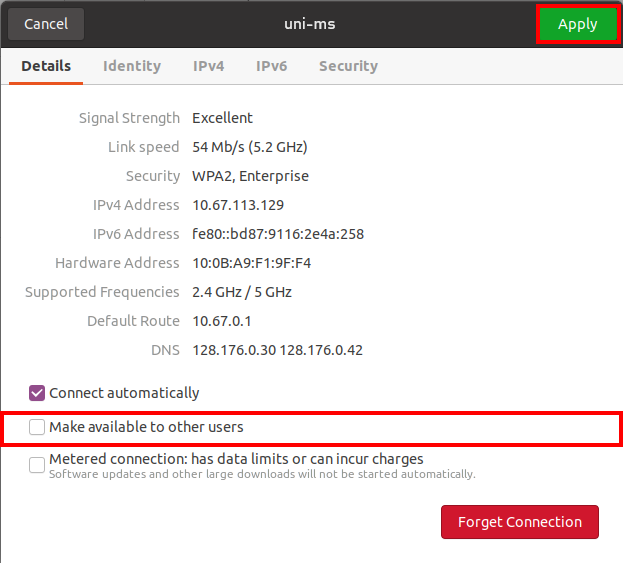
© CIT Now deactivate the option "Make available to other users" and click "Apply". With that being done, the Wi-Fi configuration is completed.
© CIT