Setting up the wireless-LANs under Windows Vista
Content
Preconditions
Essential preconditions for the use of WLAN at Muenster University:- ZIV user ID
- Valid password for network access
- Windows Vista (or Windows 7) with current updates
- WPA2 compatible WLAN card
- Installation of the certificates
Step 1: Configuration of the WLAN
Our users have two possibilities of configuring the WLAN: An automatic configuration where the WLAN set-up is done by means of software, or the manual configuration. We advise you to first try the automatic configuration and if this should fail, continue with the manual configuration.Automatic configuration
Download the "ctWLANKloner" and the profile "uni-ms" for the wireless network of the university. Here are the download links:| Name | Link |
| ctWLANKloner | Download |
| University profile "uni-ms" | Download (click right mouse button -> save target as) |
If the error message appears "error when initializing WLAN management: unknown error, your WLAN card is probably not managed by Windows, but by a producer tool. In this case deactivate the tool or continue with manual configuration.
Manual configuration
Step 1 : Open the Windows start menu and choose Connect To (see image 1)
 image 1
Step 2 : All received wireless networks will be shown. If no wireless networks are displayed there is something wrong with your wireless card or you are not in range of a network. We would like to set up a connection to uni-ms. For that, please choose Set up connection or network (see image 2)
 image 2
Step 3 : Choose menu item Manually connect to a wireless network and click Next (see image 3)
 image 3
Step 4 : In the following dialog, enter all data as shown in the image 4 below.
As network name (SSID) enter uni-ms.
As security type choose WPA2-Enterprise (or WPA).
Adjust the encryption type to AES (or TKIP with WPA).
Then click Next.
If WPA is not available, your wireless LAN card or your driver unit do not provide it. Try to update your driver unit or get new hardware. An access to the wireless LAN is not possible, until your driver unit or your wireless LAN card do not provide WPA at least. AES is the more secure encoding and is recommended. Our hotspots provide TKIP and AES.
 image 4
Step 5 : If you have already tried connect to the network uni-ms then a message appears. You should click use the already existing network, otherwise click Connect to... (see image 5)
 image 5
Step 6 : Now the network overview reappears. If not, open the start menu and choose Connect To. With the right mouse button choose the net uni-ms and open the properties. (see image 6)
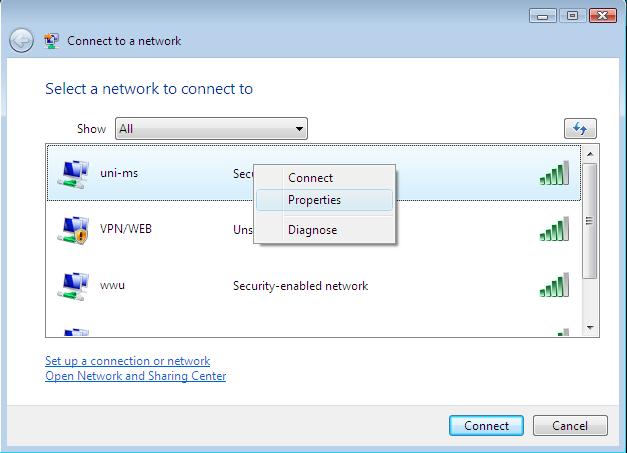 image 6
Step 7 : In the following window choose the tab security. Perform all set-ups according to the image 7.
As network authentication method choose Protected EAP (PEAP). Then click settings.
 image 7
Step 8 : Activate the option Validate server certificate and under Trusted Root Certification Authorities choose Deutsche Telekom Root CA 2. Under Authentication method choose Secured Password (EAP-MSCHAP v2)_. Click __configure. (see image 8)
 image 8
Step 9 : Deactivate the option Automatically use my Windows logon name and password (and domain if any). (see image 9)
Configuration is now complete. You can close all windows with OK.
 image 9
Step 10 : If you are within range of the university WLAN network uni-ms you can set up the first connection. For that, open once more the WLAN overview with the start menu Connect to (you should see image 10). With the right mouse button choose the network uni-ms and click Connect.
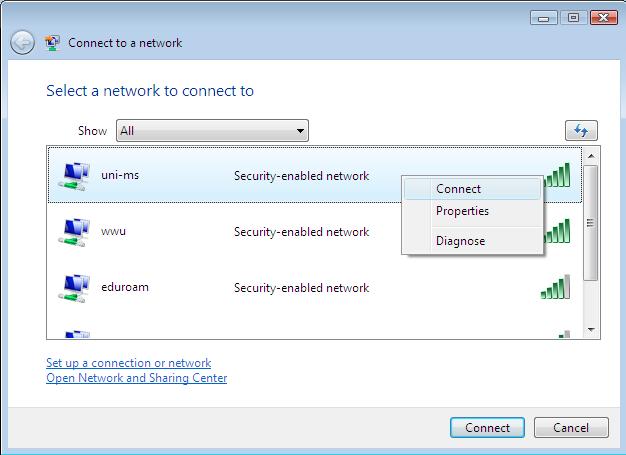 image 10
Step 11 : At this point is maybe a bug. If you click Connect in step 10 the connection maybe broke up and failed to connect. If everything went well you should see image 11. If the connection failed to connect there is maybe a popup window in the bottom right corner (see image 12) which shows the information Additional information is required to connect to uni-ms. Click on it.
At the end you should see image 13 from step 12.
 image 11
 image 12
Step 12 : You will now be asked to enter your user ID. As user name and password enter your central user ID and your password for network access (not the central standard password). Do not enter a registration domain.
 image 13
Step 13 : Now click OK. User name and password will now be checked. If the connection has been set up successfully, another information window will appear.
 image 14
Step 2: Settings in the registry (optional) for Windows Vista only
When Windows Vista was released, it turned out that at several access points of the university there have been problems setting up a WLAN connection. Among the affected access points are the ones in the ULB, the UKM and the Mathematics Department. If you have problems connecting with the W-LAN, it is necessary to execute the following steps: Step 1 : Download the current version of the tool to adjust the registry here. (Tool is only available in german) Step 2 : Click Run as administrator with the right mouse button. (see image 15)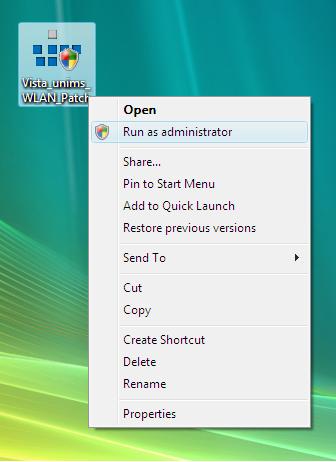 Image 15
Step 3 : In the window user account control click Allow. (see image 16)
Image 15
Step 3 : In the window user account control click Allow. (see image 16)
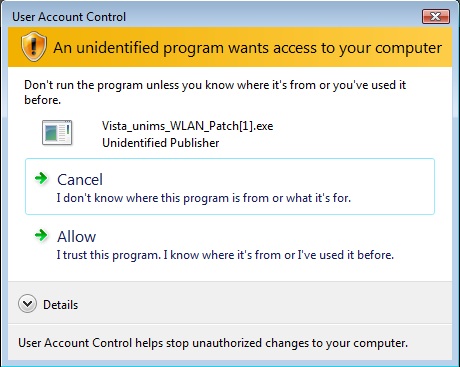 Image 16
Step 4 : At *Wählen Sie ihren WLAN-Adapter aus" choose your W-LAN adapter and click Durchführen. You will receive feedback whether the program was able to carry out the changes. (see image 17)
Image 16
Step 4 : At *Wählen Sie ihren WLAN-Adapter aus" choose your W-LAN adapter and click Durchführen. You will receive feedback whether the program was able to carry out the changes. (see image 17)
 Image 17
Step 5 : Restart your computer and try to connect again.
(Alternatively, you can also adjust the settings yourself.)
Image 17
Step 5 : Restart your computer and try to connect again.
(Alternatively, you can also adjust the settings yourself.)
-- LauraOeste - 2011-05-04
-- Update ChrisF - 2011-08-17
Topic revision: r6 - 2014-01-23 - a_5fhuth01


Ideas, requests, problems regarding ZIVwiki? Send feedback
Datenschutzerklärung Impressum