Tags:
view all tags
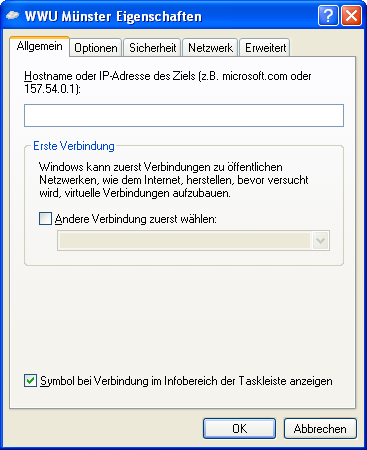
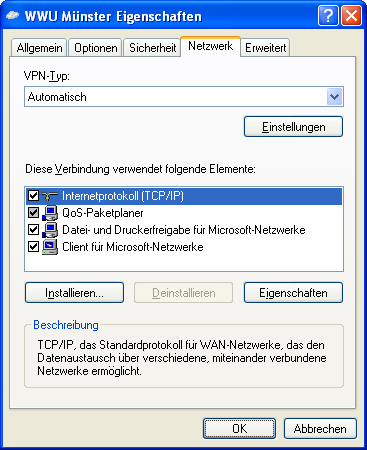
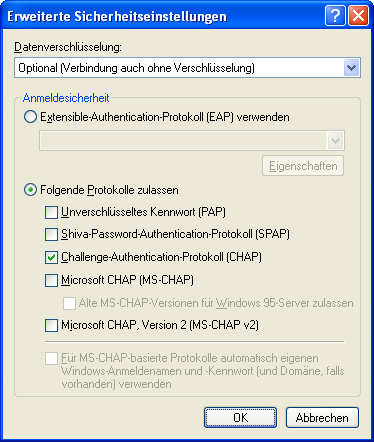
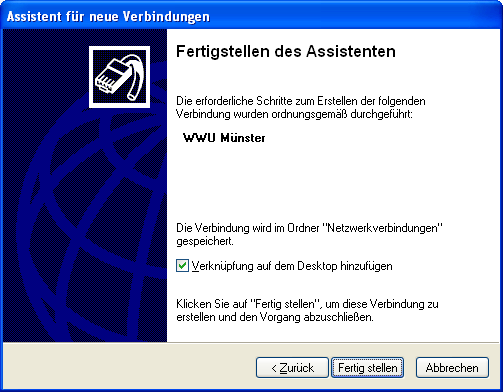
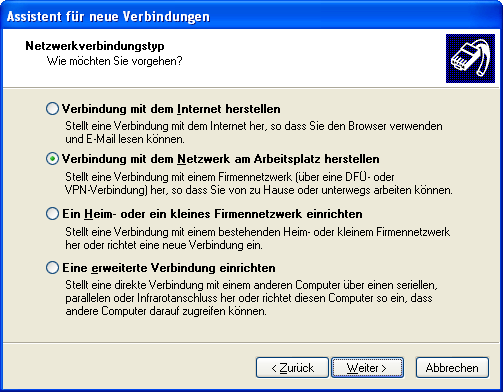
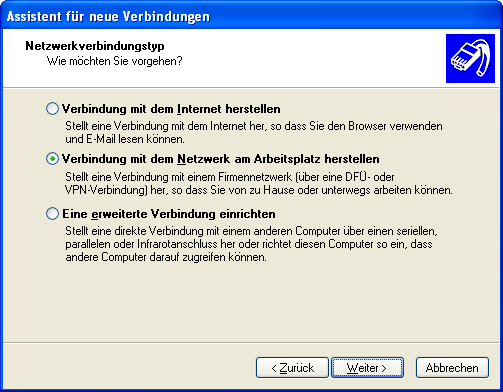
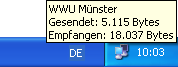
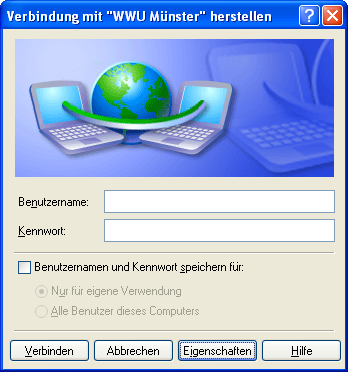
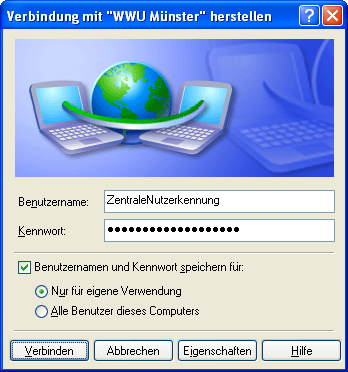
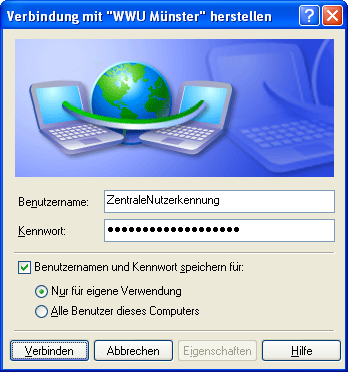
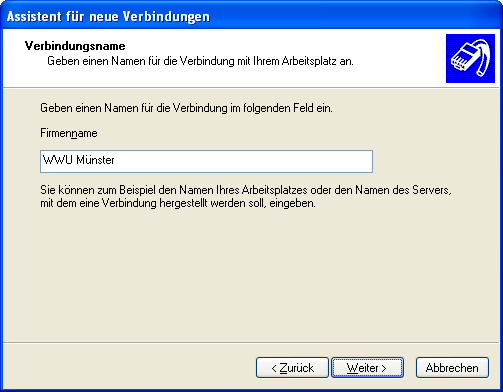
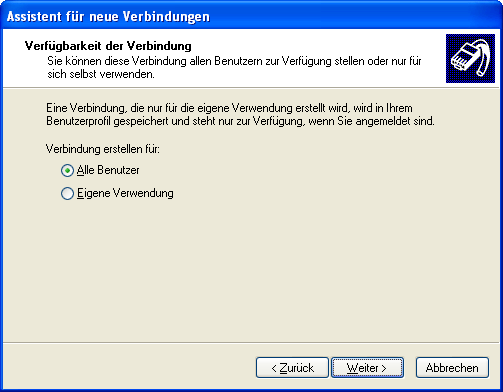
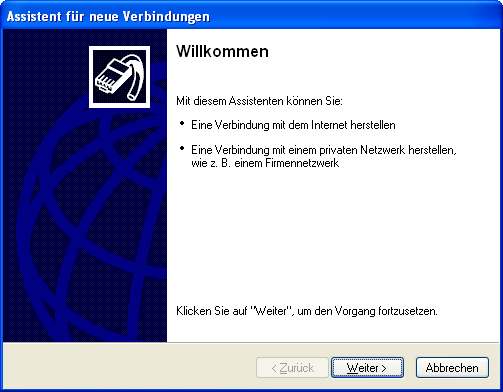
---+!! Einrichtung einer VPN-Verbindung (PPTP) unter Windows XP <editsections/> %TOC{title="Inhalt"}% ---++ Voraussetzungen Für die Einrichtung einer VPN-Verbindung sind folgende Voraussetzungen zu erfüllen: * Windows XP ist installiert * Sie besitzen eine gültige Nutzerkennung des ZIV und haben unter [[http://www.uni-muenster.de/ZIV/MeinZIV/][Mein ZIV]] ein Netzzugangspasswort eingerichtet * eine Verbindung zum Kommunikationsnetz der Universität Münster ist vorhanden, zum Beispiel über * [[Anleitungen.PLANetHome][pLANet]] * mit der Universität Münster direkt verbundene Netze oder Netzbereiche wie Wohnheimnetze etc. * einen Interzugang eines Internet Service Provider (ISP), zum Beispiel DSL über Telekom, Arcor, Versatel, 1&1, etc. * ein Ausdruck der aktuellen [[http://www.uni-muenster.de/ZIV/Kommunikationssysteme/VPN/vpn_technik.html][Technischen Informationen zu den VPN-Systemen]] (http://www.uni-muenster.de/ZIV/Kommunikationssysteme/VPN/vpn_technik.html) oder einen Auszug daraus liegt bereit ---++ VPN-Verbindung einrichten Die Einrichtung der VPN-Verbindung erfolgt in zwei Schritten. Zuerst wird eine Verbindung mit einer Grundkonfiguration erstellt. Anschließend werden spezielle Eigenschaften der Verbindung angepasst. ---+++ Verbindung erstellen Starten Sie den __Assistenten für neue Verbindungen__ (Klicken Sie auf _Start_, zeigen Sie dann nacheinander auf _Alle Programme_, _Zubehör_, _Kommunikation_. Klicken Sie anschließend auf _Assistent für neue Verbindungen_). <div class="twikiLeft" style="margin:0em 2em 1em 0em;"> %ATTACHURL%/VPN_WinXP_Willkommen.png </div> Klicken Sie auf _Weiter_. <div class="twikiClear"></div> <div class="twikiLeft" style="margin:0em 2em 1em 0em;"> %ATTACHURL%/VPN_WinXP_Netzwerkverbindungstyp.png </div> Wählen Sie die Option "Verbindung mit dem Netzwerk am Arbeitsplatz herstellen" und klicken Sie anschließend auf _Weiter_. %H% _Die Option "Ein Heim- oder ein kleines Firmennetzwerk einrichten" steht nur unter bestimmten Bedingungen zur Auswahl. Die nebenstehende Anzeige kann daher von der Anzeige auf Ihrem Rechner abweichen._ <div class="twikiClear"></div> <div class="twikiLeft" style="margin:0em 2em 1em 0em;"> %ATTACHURL%/VPN_WinXP_Netzwerkverbindung.png </div> Wählen Sie die Option "VPN-Verbindung" und klicken Sie anschließend auf _Weiter_. <div class="twikiClear"></div> <div class="twikiLeft" style="margin:0em 2em 1em 0em;"> %ATTACHURL%/VPN_WinXP_Verbindungsname.png </div> Geben Sie im Eingabefeld "Firmanname" des Assistenten einen Namen Ihrer Wahl für die VPN-Verbindung an, zum Beispiel "WWU Münster". %T% _Wenn Sie mehrere VPN-Verbindungen zur Universität Münster einrichten, sollten Sie entsprechend benennen, zum Beispiel "WWU Münster (VPN via pLANet)", wenn Sie eine VPN-Verbindung für die Verwendung mit pLANet einrichten oder "WWU Münster (VPN via Internet)", wenn Sie eine VPN-Verbindung über das Internet herstellen._ Klicken Sie auf _Weiter_. <div class="twikiClear"></div> %H% _Die folgende Anzeige erscheint nur, wenn auf Ihrem Rechner keine dauerhafte Netzwerkverbindung (z.B. LAN-Anschluss) konfiguriert ist._ <div class="twikiLeft" style="margin:0em 2em 1em 0em;"> %ATTACHURL%/VPN_WinXP_OeffentlichesNetzwerk.png </div> Wählen Sie die Option "Keine Anfangsverbindung automatisch wählen" und klicken Sie anschließend auf _Weiter_. <div class="twikiClear"></div> <div class="twikiLeft" style="margin:0em 2em 1em 0em;"> %ATTACHURL%/VPN_WinXP_VPNServerauswahl.png </div> Geben Sie im Eingabefeld "Hostname oder IP-Adresse [...]" den Hostnamen oder die IP-Adresse des VPN-Routers ein. Die aktuellen Hostnamen und IP-Adressen für die verschiedenen VPN-Anwendungsbereiche (pLANet, Internet, etc.) erfahren sie aus den [[http://www.uni-muenster.de/ZIV/Kommunikationssysteme/VPN/vpn_technik.html][Technischen Informationen zu den VPN-Systemen]] auf der [[http://www.uni-muenster.de/ZIV/index.html][Website des ZIV]]. Es ist wichtig, dass sie diese IP-Adresse beziehungsweise den Hostnamen richtig eingeben. Bitte beachten Sie, dass nach Möglichkeit der Hostname angegeben wird und nicht die IP-Adresse. In manchen Fällen steht jedoch kein DNS-Dienst zur Namensauflösung zur Verfügung, so dass dort nur die IP-Adresse verwendet werden darf. Klicken Sie auf _Weiter_. <div class="twikiClear"></div> %H% _Die folgende Anzeige erscheint nur, wenn auf Ihrem Rechner mehrere Benutzer eingerichtet sind._ <div class="twikiLeft" style="margin:0em 2em 1em 0em;"> %ATTACHURL%/VPN_WinXP_Verfuegbarkeit.png </div> Wählen Sie die Option "Alle Benutzer" (falls möglich). Falls Sie auf Ihrem Rechner mit eingeschränkten Nutzerrechten arbeiten, können Sie nur die Option "Eigene Verwendung" auswählen. Klicken Sie auf _Weiter_. <div class="twikiClear"></div> <div class="twikiLeft" style="margin:0em 2em 1em 0em;"> %ATTACHURL%/VPN_WinXP_FertigStellen.png </div> Markieren Sie die Option "Verknüpfung auf dem Desktop hinzufügen". Klicken Sie anschließend auf _Fertig stellen_. <div class="twikiClear"></div> <div class="twikiLeft" style="margin:0em 2em 1em 0em;"> %ATTACHURL%/VPN_WinXP_DesktopSymbol.png </div> Auf Ihrem Desktop finden Sie nun ein Symbol für die neue Verbindung. <div class="twikiClear"></div> Bevor Sie die VPN-Verbindung zum ersten Mal herstellen, müssen noch einige Eigenschaften der VPN-Verbindung angepasst werden. ---+++ Eigenschaften der Verbindung anpassen Doppelklicken Sie auf dem Desktop auf das Symbol für die neue Verbindung.%BR% (Alternativ: Klicken Sie auf _Start_, zeigen Sie auf _Verbinden mit_ und klicken anschließend auf die neue Verbindung.) <div class="twikiLeft" style="margin:0em 2em 1em 0em;"> %ATTACHURL%/VPN_WinXP_VerbindungMit.png </div> Klicken Sie auf _Eigenschaften_. <div class="twikiClear"></div> <div class="twikiLeft" style="margin:0em 2em 1em 0em;"> %ATTACHURL%/VPN_WinXP_Eigenschaften_Allgemein.png </div> Kontrollieren Sie, ob im Eingabefeld "Hostnamen oder IP-Adresse des Ziels [...]" der Hostname beziehungsweise die IP-Adresse des VPN-Routers entsprechend den [[http://www.uni-muenster.de/ZIV/Kommunikationssysteme/VPN/vpn_technik.html][Technischen Informationen zu den VPN-Systemen]] eingetragen ist. Korrigieren Sie den Eintrag gegebenenfalls. Klicken Sie auf den Reiter _Sicherheit_. <div class="twikiClear"></div> <div class="twikiLeft" style="margin:0em 2em 1em 0em;"> %ATTACHURL%/VPN_WinXP_Eigenschaften_Sicherheit.png </div> Wählen Sie die Option "Erweitert (benutzerdefinierte Einstellungen)" und klicken Sie dann auf _Einstellungen_. <div class="twikiClear"></div> <div class="twikiLeft" style="margin:0em 2em 1em 0em;"> %ATTACHURL%/VPN_WinXP_ErweiterteSicherheitseinstellungen.png </div> Stellen Sie als "Datenverschlüsselung" die Auswahl "Optional (Verbindung auch ohne Verschlüsselung)" ein. Wählen Sie die Option "Folgende Protokolle zulassen" aus und markieren Sie die Option "Challenge-Authentication-Protokoll (CHAP)". Alle anderen Optionen dürfen nicht markiert sein. Klicken Sie anschließend auf _OK_. <div class="twikiClear"></div> %ATTACHURL%/VPN_WinXP_Sicherheitsabfrage.png Bestätigen Sie, dass Sie die Einstellungen beibehalten wollen, indem Sie auf _Ja_ klicken. Sie sehen nun wieder den Reiter _Sicherheit_. %H% _Die folgende Einstellung können Sie nur vornehmen, falls Sie auf Ihrem Rechner als Adminstrator angemeldet sind oder Administratorrechte besitzen._ Klicken Sie auf den Reiter _Erweitert_.%BR% %ATTACHURL%/VPN_WinXP_Eigenschaften_Erweitert.png <div class="twikiRight" style="margin-bottom:0% 0% 2% 2%;width:49%;"> %T% _Sie sollten das Service-Pack 2 von Windows XP installieren, um einen besseren Schutz Ihres Rechners vor Schadprogrammen und Angriffen aus verbundenen Rechnernetzen zu gewährleisten._ </div> Erscheint die linke Anzeige, haben Sie Service-Pack 2 noch nicht installiert. Markieren Sie in diesem Falle die Option "Diesen Computer und das Netzwerk schützen [...]". <div class="twikiClear"></div> Erscheint die rechte Anzeige, haben Sie Service-Pack 2 installiert. Sofern Sie an der Firewall nichts wissentlich deaktiviert haben, ist nichts zu tun. Sicherheitshalber können Sie aber auf _Einstellungen_ klicken und den Zustand der Firewall kontrollieren. Klicken Sie anschließend auf _OK_. Damit ist die Einrichtung der VPN-Verbindung beendet. ---++ VPN-Verbindung herstellen Bevor Sie eine VPN-Verbindung herstellen, müssen Sie zunächst sicherstellen, dass eine Verbindung zum Kommunikationsnetz der Universität Münster besteht (siehe [[#Voraussetzungen][Voraussetzungen]]). In Wohnheimnetzen mit Verbindung zur Universität ist in der Regel nichts Besonderes mehr dazu zu tun. Doppelklicken Sie auf dem Desktop auf das Symbol für die neue Verbindung.%BR% (Alternativ: Klicken Sie auf _Start_, zeigen Sie auf _Verbinden mit_ und klicken anschließend auf die neue Verbindung.) <div class="twikiLeft" style="margin:0em 2em 1em 0em;"> %ATTACHURL%/VPN_WinXP_VerbindungMit_Verbinden.png </div> Geben Sie in die Eingabefelder "Benutzername" und "Kennwort" Ihre *zentrale Nutzerkennung* beziehungsweise Ihr *Netzzugangspasswort* ein. Damit Sie Ihre zentrale Nutzerkennung und Ihr Netzzugangspasswort nicht bei jedem Verbindungsaufbau erneut eingeben müssen, können Sie die Option "Benutzernamen und Kennwort speichern für" markieren. Wählen Sie dann aber unbedingt die Option "Nur für eigene Verwendung", damit kein anderer Benutzer Ihre Zugangsdaten verwenden kann. Klicken Sie danach auf _Verbinden_.%BR% <div class="twikiClear"></div> Die VPN-Verbindung wird hergestellt. <div class="twikiLeft" style="margin:0em 2em 1em 0em;"> %ATTACHURL%/VPN_WinXP_TaskleistenSymbol.png </div> Ob die VPN-Verbindung erfolgreich hergestellt wurde, erkennen Sie am nebenstehenden Symbol in der Taskleiste. %H% _In Ihrer Taskleiste werden unter Umständen mehrere dieser Symbole angezeigt. Diese Anleitung bezieht sich ausschließlich auf das Symbol für die VPN-Verbindung. Wenn Sie mit der Maus über die Symbole fahren, erkennen Sie das Symbol der VPN-Verbindung am angezeigten Namen der Verbindung._ <div class="twikiClear"></div> ---++ VPN-Verbindung trennen Um die VPN-Verbindung zu trennen, klicken Sie auf das Symbol in der Taskleiste. <div class="twikiLeft" style="margin:0em 2em 1em 0em;"> %ATTACHURL%/VPN_WinXP_Status.png </div> Klicken Sie auf _Trennen_. <div class="twikiClear"></div> Die VPN-Verbindung wird getrennt. Wenn das Symbol aus der Taskleiste verschwindet, wurde die VPN-Verbindung erfolgreich getrennt. ---++ Weitere Informationen * [[http://support.microsoft.com/kb/314076/de][In Windows XP eine Verbindung zu einem virtuellen privaten Netzwerk (VPN) konfigurieren]]
Attachments
Attachments
Topic attachments
I
Attachment
History
Action
Size
Date
Who
Comment
png
VPN_WinXP_DesktopSymbol.png
r1
manage
2.5 K
2007-08-27 - 10:25
PhilippKegel
png
VPN_WinXP_Eigenschaften_Allgemein.png
r1
manage
31.2 K
2007-08-24 - 11:52
PhilippKegel
png
VPN_WinXP_Eigenschaften_Erweitert.png
r1
manage
94.9 K
2007-08-24 - 11:52
PhilippKegel
png
VPN_WinXP_Eigenschaften_Netzwerk.png
r1
manage
31.9 K
2007-08-24 - 11:52
PhilippKegel
png
VPN_WinXP_Eigenschaften_Sicherheit.png
r1
manage
37.1 K
2007-08-24 - 11:53
PhilippKegel
png
VPN_WinXP_ErweiterteSicherheitseinstellungen.png
r1
manage
23.2 K
2007-08-24 - 11:53
PhilippKegel
png
VPN_WinXP_FertigStellen.png
r1
manage
22.6 K
2007-08-24 - 11:53
PhilippKegel
png
VPN_WinXP_Netzwerkverbindung.png
r1
manage
18.4 K
2007-08-24 - 11:53
PhilippKegel
png
VPN_WinXP_Netzwerkverbindungstyp.png
r2
r1
manage
20.6 K
2007-08-28 - 07:02
PhilippKegel
png
VPN_WinXP_OeffentlichesNetzwerk.png
r1
manage
16.1 K
2007-08-28 - 07:03
PhilippKegel
png
VPN_WinXP_Sicherheitsabfrage.png
r1
manage
13.7 K
2007-08-24 - 11:54
PhilippKegel
png
VPN_WinXP_Smartcards.png
r1
manage
17.6 K
2007-08-24 - 11:54
PhilippKegel
png
VPN_WinXP_Status.png
r1
manage
35.1 K
2007-08-27 - 10:27
PhilippKegel
png
VPN_WinXP_TaskleistenSymbol.png
r1
manage
3.9 K
2007-08-27 - 10:26
PhilippKegel
png
VPN_WinXP_VPNServerauswahl.png
r1
manage
16.2 K
2007-08-24 - 11:55
PhilippKegel
png
VPN_WinXP_VerbindungMit.png
r1
manage
42.1 K
2007-08-24 - 11:54
PhilippKegel
png
VPN_WinXP_VerbindungMit_Verbinden.png
r3
r2
r1
manage
43.1 K
2007-08-27 - 14:31
PhilippKegel
png
VPN_WinXP_Verbindungsname.png
r1
manage
16.8 K
2007-08-24 - 11:54
PhilippKegel
png
VPN_WinXP_Verfuegbarkeit.png
r2
r1
manage
17.9 K
2007-08-27 - 10:26
PhilippKegel
png
VPN_WinXP_Willkommen.png
r1
manage
20.8 K
2007-08-24 - 11:55
PhilippKegel
Edit
|
Attach
|
Watch
|
P
rint version
|
H
istory
:
r35
|
r21
<
r20
<
r19
<
r18
|
B
acklinks
|
V
iew topic
|
Raw edit
|
More topic actions...
Topic revision: r19 - 2007-08-28
-
PhilippKegel
Home
Site map
Anleitungen web
Exchange web
Main web
TWiki web
Anleitungen Web
Create New Topic
Index
Search
Changes
Notifications
RSS Feed
Statistics
Preferences
P
P
View
Raw View
Print version
Find backlinks
History
More topic actions
Edit
Raw edit
Attach file or image
Edit topic preference settings
Set new parent
More topic actions
Account
Log In
Български
Cesky
Dansk
Deutsch
English
Español
Suomi
_Français_
Italiano
日本語
한글
Nederlands
Polski
Português
Русский
Svenska
Українська
简体中文
簡體中文
Edit
Attach
Copyright © 2008-2024 by the contributing authors. All material on this collaboration platform is the property of the contributing authors.
Ideas, requests, problems regarding ZIVwiki?
Send feedback
Datenschutzerklärung
Impressum


